Testing Anaconda
This document describes how to run Anaconda tests. Anaconda has various tests such as unit tests, rpm tests and translation tests. All the tests will be run together if you follow the steps below. For integration tests there is a separate repository kickstart-tests containing also tooling for running the tests.
Run unit tests inside of container
This is the primary and recommended way to run the tests.
Right now only unit tests are supported by the container, not rpm-tests. You can use our container image on quay.io or you can build your own image. (Optional) to build the container image run:
make -f Makefile.am anaconda-ci-build
Then you are free to run the tests without dependency installation by running:
make -f Makefile.am container-ci
This will run all the tests, including Python test coverage reports. To run just some tests you can pass parameters which will replace the current one. For example to run just some unit tests please do this:
make -f Makefile.am container-ci CI_CMD="make tests-unit-only UNIT_TESTS_PATTERN='test_layout_variant_'"
The UNIT_TESTS_PATTERN variable is passed to pytest -k. See
the documentation for more info.
To run a different kind of test than unit tests, do this:
make -f Makefile.am container-ci CI_CMD="make check TESTS='cppcheck/runcppcheck.sh'"
WARNING:
Just one command can be passed like this, if && is used then only first one is run in the container but everything else is started on host!
Logs from the run are stored in the test-logs/ folder; no other files are
modified/touched by the container (it works on an internal copy of the host’s
anaconda directory).
Interactively work inside of container
For interactively working in the container you can run:
make -f Makefile.am container-shell
This command will open bash inside the container for you with mounted current folder at the /anaconda path. This is a convenient way how to run tests but avoid constant call of autotools and build during the development.
Prepare the environment and build the sources:
./autogen.sh
./configure
make
Executing the tests can be done with:
make check
To run a single test do:
make TESTS=unit_tests/unit_tests.sh check
To run a subset of unit tests do:
make TESTS=unit_tests/unit_tests.sh UNIT_TESTS_PATTERN='test_layout_variant_' check
The UNIT_TESTS_PATTERN variable is passed to pytest -k. See
the documentation for more info.
See tests/Makefile.am for possible values. Alternatively you can try:
make ci
This has the advantage of producing Python test coverage for all tests. In case the ci target fails there is also a coverage-report target which can be used to combine the multiple .coverage files into one and produce a human readable report.
Note
Please update your container from time to time to have newest dependencies. To do that, run podman pull quay.io/rhinstaller/anaconda-ci:master or build it locally again.
Run rpm tests inside of container
First, build the container image for running the test, as it does not yet get published to any registry:
make -f Makefile.am anaconda-rpm-build
Then run the test in that container:
make -f Makefile.am container-rpm-test
Run unit tests with patched pykickstart or other libraries
Pull the container:
podman pull quay.io/rhinstaller/anaconda-ci:master
Run the container temporary with your required resources (pykickstart in this example):
podman run --name=cnt-add --rm -it -v pykickstart/:/pykickstart:z quay.io/rhinstaller/anaconda-ci:master sh
Do your required changes in the container (install pykickstart in this example):
cd /pykickstart && make install DESTDIR=/
Commit the changed container as updated one. DO NOT exit the running container, run this command in new terminal!
podman commit cnt-add quay.io/rhinstaller/anaconda-ci:master
You can change the
mastertag to something else if you don’t want to replace the existing one. Feel free to exit the running container now.Run other commands for container ci as usual. Don’t forget to append
CI_TAG=<your-tag>to make calls if you committed the container under a custom tag.
GitHub workflows
All test and maintenance actions are run by GitHub workflows. These YAML files completely describe what steps are required to run some action, what are its triggers and so on.
Pull request for master:
Unit and rpm tests are run by the validate.yml workflow. We use GitHub’s runners for this so we don’t have to care about what is executed there.
The workflow rebuilds the anaconda-ci container if the container files
have changed, otherwise it is pulling the container from quay.io. For more
information see below.
Pull request for RHEL:
Unit and rpm tests are run by the validate-rhel-8.yml workflow on (fully automatically deployed) self-hosted runners in our Upshift instance.
These runners are anaconda-ci:rhel8 containers with all the dependencies in
place so the yml configuration will just execute tests. You can start runners
locally by running the container and providing GitHub token. That is pretty
valuable in case of workflow testing. See github-action-run-once for more
details.
To protect our self-hosted runners, tests only run automatically for
rhinstaller organization members.
For external contributors, an organization member needs to approve the test run
by sending a comment starting with /tests.
Running kickstart-tests:
The kickstart-tests.yml workflow allows rhinstaller organization members to
run kickstart-tests against an anaconda PR (only master for now). Send a
comment that starts with /kickstart-tests <launch options> to the pull
request to trigger this. See the kickstart launch script documentation and
its --help for details what is supported; the two basic modes are running
a set of individual tests:
/kickstart-tests keyboard [test2 test3 ...]
or running all tests of one or more given types:
/kickstart-tests --testtype network,autopart
Container maintenance
All active branches run tests in containers. Containers have all the dependencies installed and the environment prepared to run tests or connect our GitHub runners (used by RHEL only).
Automatic container build
Containers are updated daily by the container-autoupdate.yml workflow
from Anaconda master repository. Before pushing a new
container, tests are executed on this container to avoid regressions.
Manual container build
Just go to the actions tab in the Anaconda repository to the
“Refresh container images“ and press the Run workflow button on a button on
a particular branch. Usually master, but for testing a change to the
container you can push your branch to the origin repo and run it from there.
Security precautions for testing RHEL
Getting into our host/internal network
One of the main precautions is that each container test run has a limited time and is destroyed after timeout/end of test. That should narrow what attackers could do or how they can create a backdoor. See the image for more info:
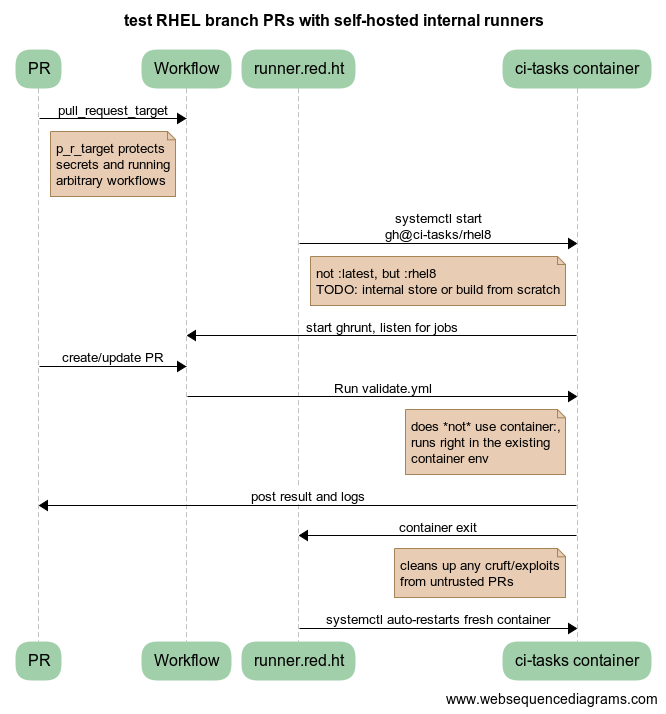
Another hardening of this is potential issue is that only PRs approved by/created by users with permission to write are able to run the tests. To achieve this we have two ways how to start the test.
PR created by rhinstaller member – these are started from the RHEL branch
workflow file by pull_request_target as usual. This workflow has two
dependent jobs. First will check user privileges, second will run the tests in
case the first one succeeded.
PR created by external contributors – these have to be started by workflow
file validate-rhel-8.yml workflow from the master branch
checking all the comments. If comment starts with /test phrase it will check
the owner of the comment. When everything succeed it will set progress on the pull
request originating the comment and start the tests. This progress is updated
based on the result of the tests. As explained above, the whole implementation
of the workflow is in the master branch which could be pretty confusing.
Changing workflow file by attacker
Because test description is part of the repository, attackers may change
workflow files by creating PR to do their malicious attack. Because of that we
are using pull_request_target instead of pull_request trigger. The main
difference is that pull_request_target will run your PR tests on the target
branch not on your PR branch. So workflow configuration has to be merged first
to apply workflow changes. This has to be set on all workflow files in all
branches, otherwise attackers could change existing workflow files to use our
runners even for branches where they are not normally used. Unfortunately,
self-hosted runners can’t be bound to the branch, they are bound to the repo.
How can I change the workflow
Due to our hardening it’s not possible to just create PR and see the result of your change on the PR checks tab. You have to create PR on your fork branch which has the updated workflow. I would recommend you to create a test organization for this and avoid creating a new account.
Similar situation works even for workflow to automatically update our containers.
This workflow has schedule and manual_dispatch triggers. schedule
triggers are always run on the default branch. For testing updates, always add
manual_dispatch so that you can run them from your branch (on either origin
or your fork).
Test Suite Architecture
Anaconda has a complex test suite structure where each top-level directory represents a different class of tests. They are
cppcheck/ - static C/C++ code analysis using the cppcheck tool;
shellcheck/ - shell code analyzer config;
dd_tests/ - Python unit tests for driver disk utilities (utils/dd);
unit_tests/dracut_tests/ - Python unit tests for the dracut hooks used to configure the installation environment and load Anaconda;
gettext/ - sanity tests of files used for translation; Written in Python and Bash;
glade_tests/ - sanity tests for .glade files. Written in Python;
rpm_tests/ - basic RPM sanity test. Checks if anaconda.rpm can be installed in a temporary directory without failing dependencies or other RPM issues and checks if all files are correctly present in the RPM;
lib/ - helper modules used during testing;
unit_tests/pyanaconda_tests/ - unit tests for the
pyanacondamodule;pylint/ - checks the validity of Python source code using the pocketlint tool;
ruff/ - config for fast but not 100% correct linter for Python;
unit_tests/regex_tests/ - Python unit tests for regular expressions defined in
pyanaconda.regexes;
Note
All Python unit tests inherit from the standard unittest.TestCase
class unless specified otherwise!
Some tests require root privileges and will be skipped if running as regular user!
The cppcheck test is optional and is automatically skipped if the package is not available.
The tests use the automake “simple tests” framework <https://www.gnu.org/software/automake/manual/automake.html#Simple-Tests>. The launcher scripts are listed under TESTS in tests/Makefile.am.
What to do if there are broken Rawhide dependencies
As first step you have to find or create a fixed build of the package to get the RPM file.
Fix GitHub actions
The GitHub actions are using containers in most of the situation. So the fixup is simple here, just modify the impacted Dockerfile and add a missing package there.
Note: Please use a comment FIXME / TODO with link to source of the issue and a message when we should remove the hotfix RPM.
Fix Packit builds
Edit the .packit.yml file and change the impacted part. If there is not already add an additional repository to our public space.
additional_repos:
  # This repository contains fixup of Rawhide broken environment.
  # Mainly useful when there is a package which is not yet in Rawhide but build is available.
  - "https://fedorapeople.org/groups/anaconda/repos/anaconda_fixup_repo/"
Next step is to upload the required packages to fedorapeople.org. Anyone who is part of the gitanaconda group have access to that space.
Cleanup old repository.
$ ssh <fedora_username>:fedorapeople.org
$ cd /project/anaconda/repos/anaconda_fixup_repo/
$ rm -rv *  # to remove the old directory structure
Create your repository locally and upload that.
$ mkdir /tmp/anaconda-repo-fixup
$ cd /tmp/anaconda-repo-fixup
$ curl -OL <packages>
$ createrepo .  # on older systems could be 'createrepo_c'
$ scp -r * <fedora_username>:fedorapeople.org:/project/anaconda/repos/anaconda_fixup_repo
After the above is done, everything should be fixed and Packit should work again.